mirror of
https://github.com/Wcowin/Mkdocs-Wcowin.git
synced 2025-07-20 08:56:35 +00:00
221 lines
6.6 KiB
Markdown
221 lines
6.6 KiB
Markdown
---
|
||
title: 利用Mkdocs部署静态网页至GitHubpages
|
||
tags:
|
||
- Mkdocs
|
||
---
|
||
|
||
!!! info
|
||
Material for MkDocs官方网站: [Material for MkDocs](https://www.mkdocs.org/)
|
||
MkDocs中文文档: [MkDocs中文文档](https://hellowac.github.io/mkdocs-docs-zh/)
|
||
---
|
||
推荐看下这个视频:
|
||
:fontawesome-brands-bilibili:{ style="color: #EE98A7" }
|
||
__[How to set up Material for MkDocs]__ by @Wcowin – :octicons-clock-24:
|
||
10m – 用MKdocs构建一个博客网站.
|
||
|
||
[How to set up Material for MkDocs]: https://space.bilibili.com/1407028951/lists/4566631?type=series
|
||
|
||
---
|
||
|
||
## 一、准备工作
|
||
|
||
1.下载[Github Desktop](https://github.com/desktop/desktop){target=“_blank”}
|
||
|
||
2.有一个GitHub账号(有手就行)
|
||
***
|
||
## 二、Creating your site
|
||
|
||
参考教程:
|
||
|
||
[利用mkdocs部署静态网页至GitHubpages(更新版)](https://blog.csdn.net/m0_63203517/article/details/129755527?spm=1001.2014.3001.5501){target=“_blank”}
|
||
|
||
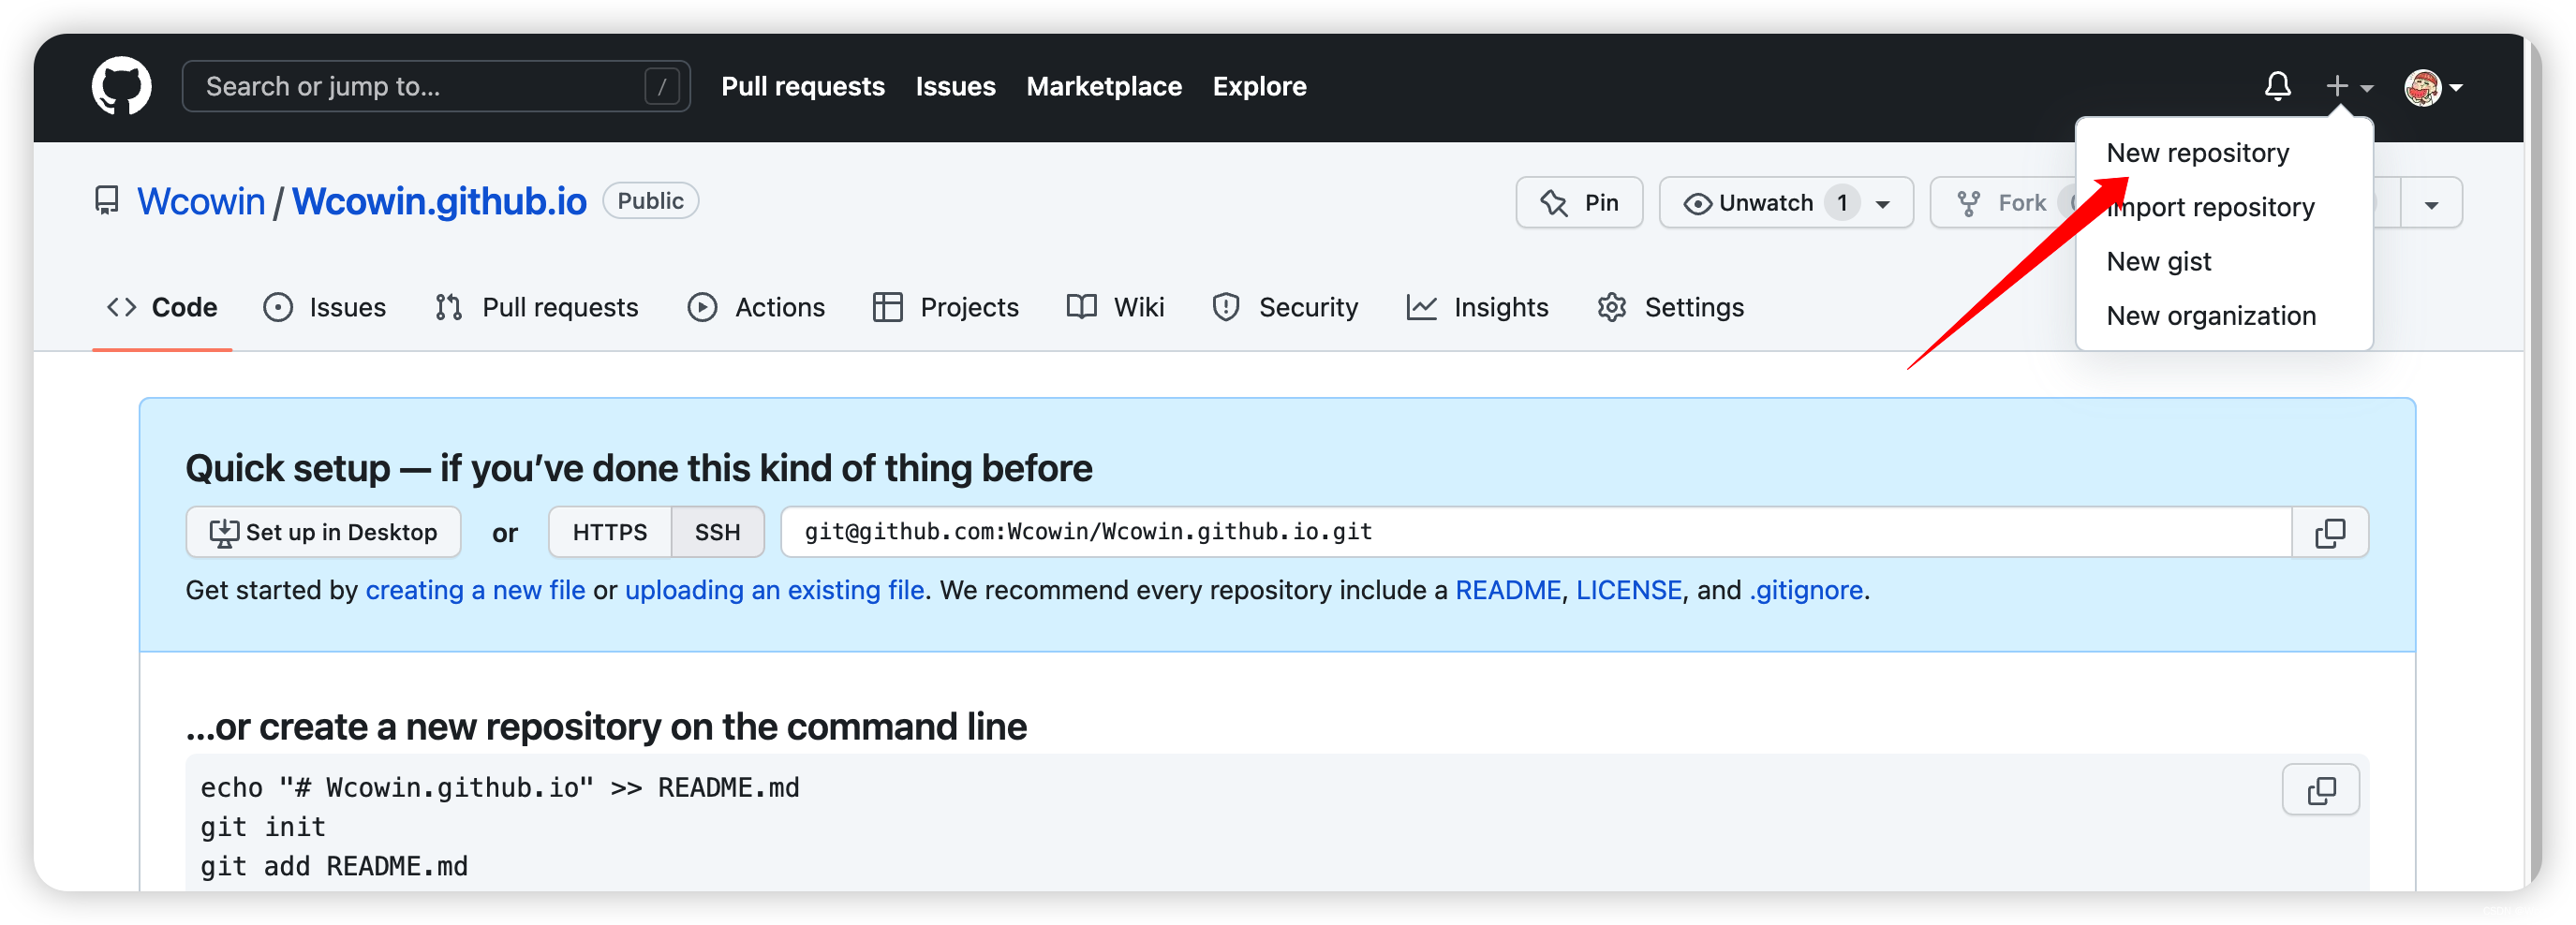
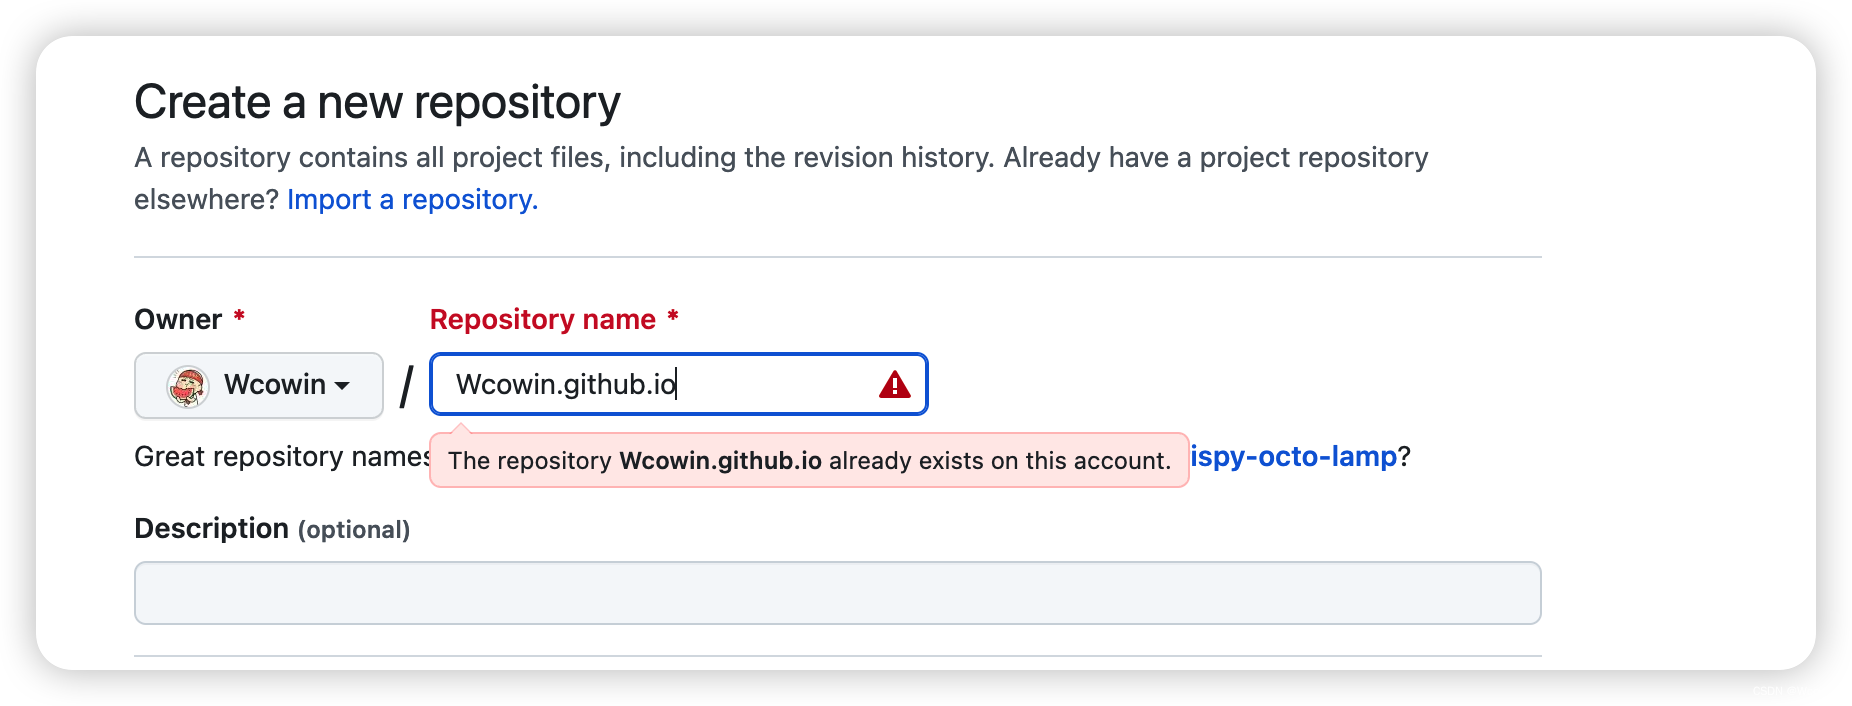
与其他教程不同,我首先建议先在Github创建一个名为你的名字+github.io的仓库
|
||
|
||
|
||
|
||
|
||
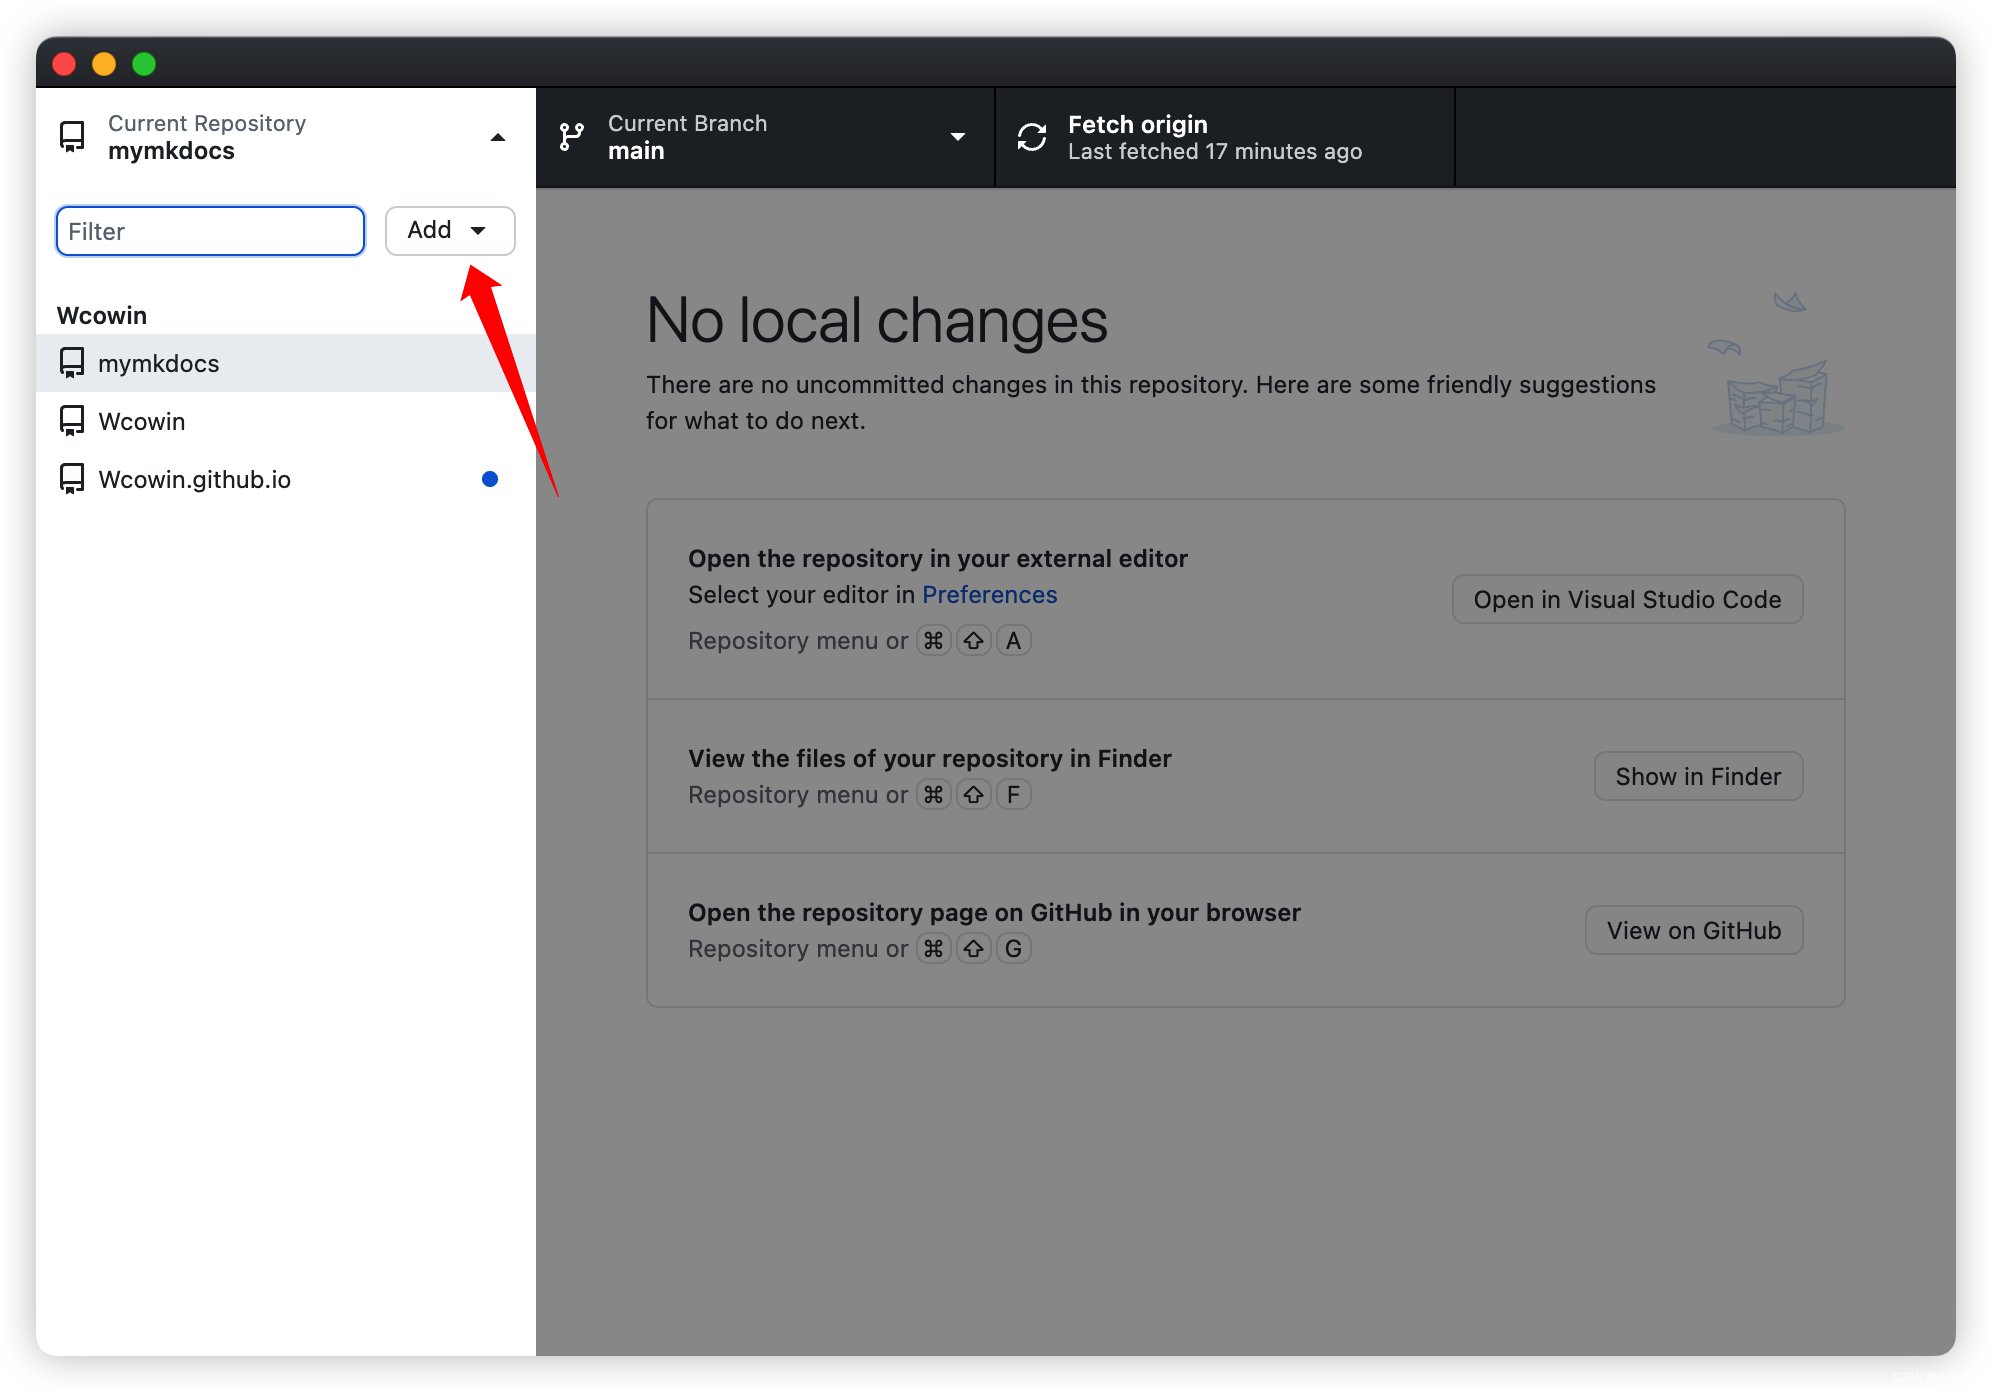
然后打开github Desktop 克隆到本地
|
||
|
||
|
||

|
||
|
||

|
||
|
||
|
||
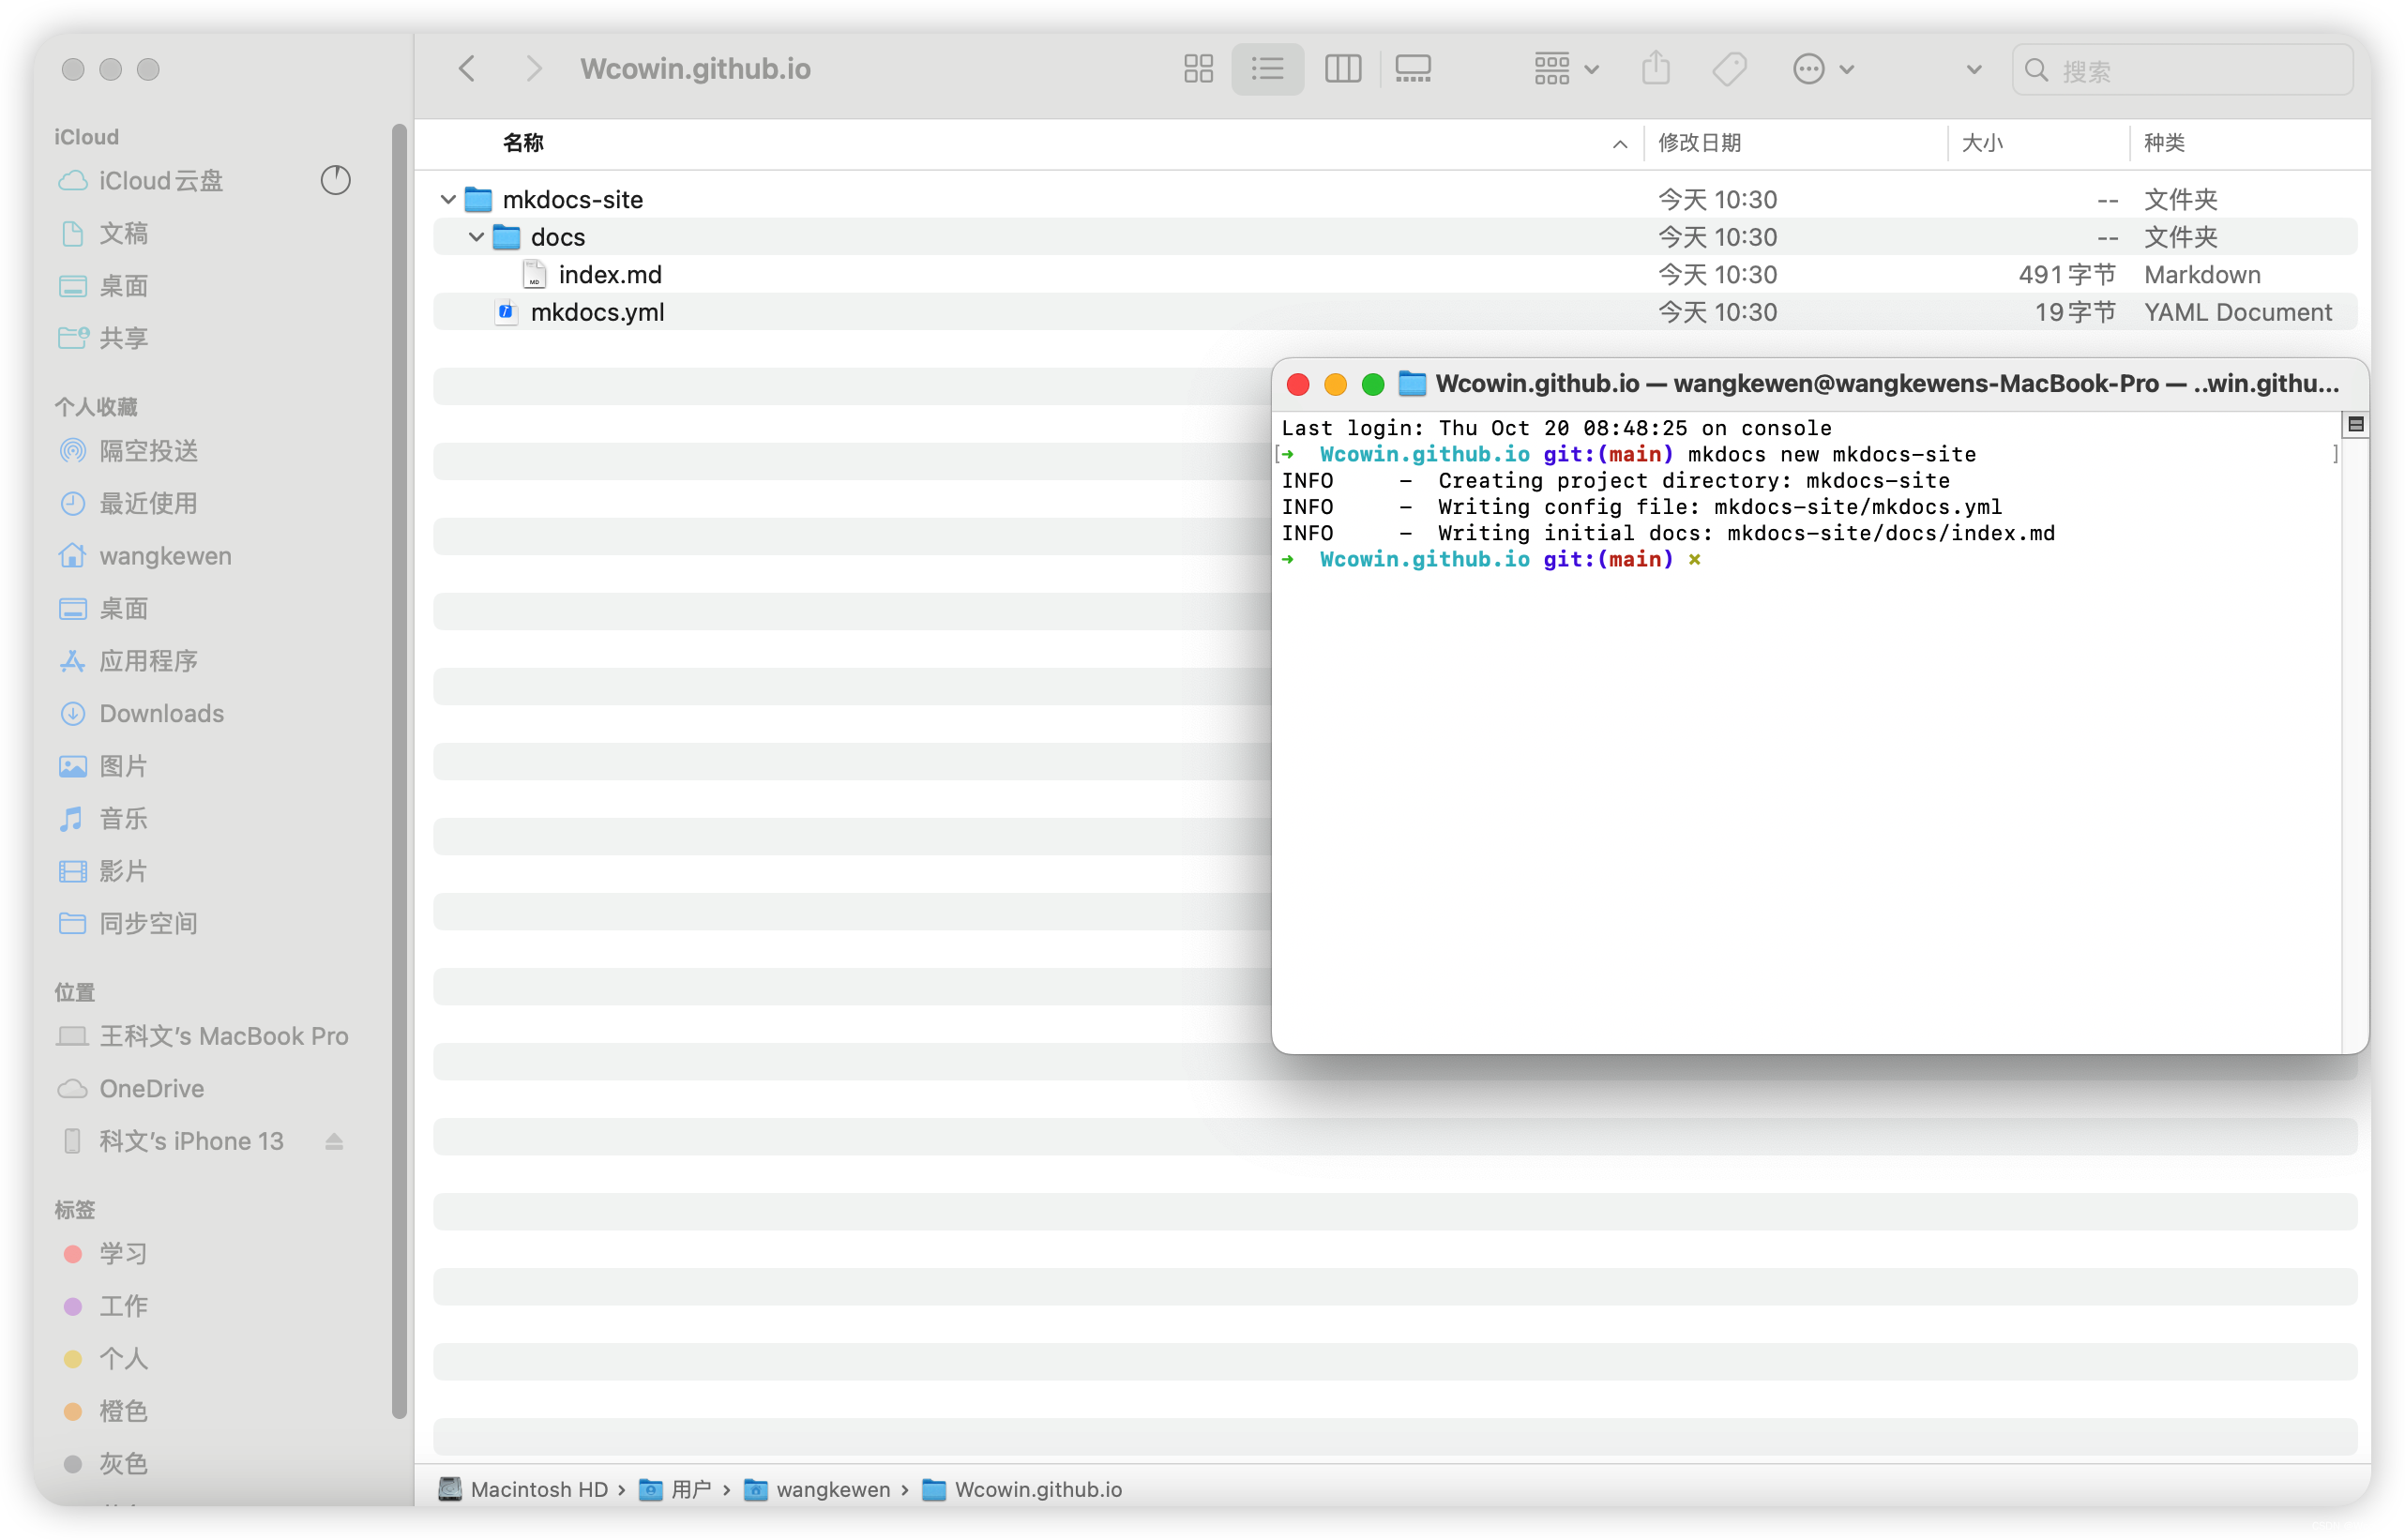
打开Wcowin.github.io目录进入终端依次运行:
|
||
```
|
||
pip install mkdocs-material
|
||
mkdocs new mkdocs-site
|
||
```
|
||
出现下图的几个文件
|
||
|
||
|
||
!!! tip
|
||
|
||
这里建议把**mkdocs-site**文件里的东西全部剪切出来到**Wcowin.github.io**文件里
|
||
|
||
|
||
**Wcowin.github.io**是克隆到本地的仓库(里面包含docs,yml文件等等),docs文件下是以后网站的内容,mkdocs.yml是配置文件(配置主题,目录,插件等)
|
||
|
||
你在这个目录下写的任何东西都可以通过Github Desktop 上传到github上
|
||
|
||
执行下面的代码添加一个GitHub Workflow
|
||
***
|
||
???note "过时的PublishMySite.yml"
|
||
(执行下面的代码添加一个GitHub Workflow(**已经过时但是仍然能用,最新方法见下方ci.yml**)
|
||
|
||
```
|
||
mkdir .github
|
||
cd .github
|
||
mkdir workflows
|
||
cd workflows
|
||
vim PublishMySite.yml
|
||
```
|
||
|
||
在PublishMySite.yml里面输入以下内容
|
||
|
||
```yaml
|
||
name: publish site
|
||
on: # 在什么时候触发工作流
|
||
push: # 在从本地main分支被push到GitHub仓库时
|
||
branches:
|
||
- main
|
||
pull_request: # 在main分支合并别人提的pr时
|
||
branches:
|
||
- main
|
||
jobs: # 工作流的具体内容
|
||
deploy:
|
||
runs-on: ubuntu-latest # 创建一个新的云端虚拟机 使用最新Ubuntu系统
|
||
steps:
|
||
- uses: actions/checkout@v2 # 先checkout到main分支
|
||
- uses: actions/setup-python@v2 # 再安装Python3和相关环境
|
||
with:
|
||
python-version: 3.x
|
||
- run: pip install mkdocs-material # 使用pip包管理工具安装mkdocs-material
|
||
- run: mkdocs gh-deploy --force # 使用mkdocs-material部署gh-pages分支
|
||
|
||
```
|
||
)
|
||
***
|
||
|
||
```
|
||
mkdir .github
|
||
cd .github
|
||
mkdir workflows
|
||
cd workflows
|
||
vim ci.yml
|
||
```
|
||
|
||
进入.github/workflows/ci.yml,然后复制并粘贴以下内容:
|
||
|
||
```yaml
|
||
name: ci
|
||
on:
|
||
push:
|
||
branches:
|
||
- master
|
||
- main
|
||
permissions:
|
||
contents: write
|
||
jobs:
|
||
deploy:
|
||
runs-on: ubuntu-latest
|
||
steps:
|
||
- uses: actions/checkout@v4
|
||
- name: Configure Git Credentials
|
||
run: |
|
||
git config user.name github-actions[bot]
|
||
git config user.email 41898282+github-actions[bot]@users.noreply.github.com
|
||
- uses: actions/setup-python@v4
|
||
with:
|
||
python-version: 3.x
|
||
- run: echo "cache_id=$(date --utc '+%V')" >> $GITHUB_ENV
|
||
- uses: actions/cache@v3
|
||
with:
|
||
key: mkdocs-material-${{ env.cache_id }}
|
||
path: .cache
|
||
restore-keys: |
|
||
mkdocs-material-
|
||
- run: pip install mkdocs-material
|
||
- run: mkdocs gh-deploy --force
|
||
```
|
||
|
||
|
||
到这里先检查一下你的目录结构
|
||
目录树状图:
|
||
```
|
||
$ tree -a
|
||
Wcowin.github.io
|
||
├── .github
|
||
│ ├── .DS_Store
|
||
│ └── workflows
|
||
│ └── ci.yml
|
||
├── docs
|
||
│ └── index.md
|
||
└── mkdocs.yml
|
||
```
|
||
|
||
|
||
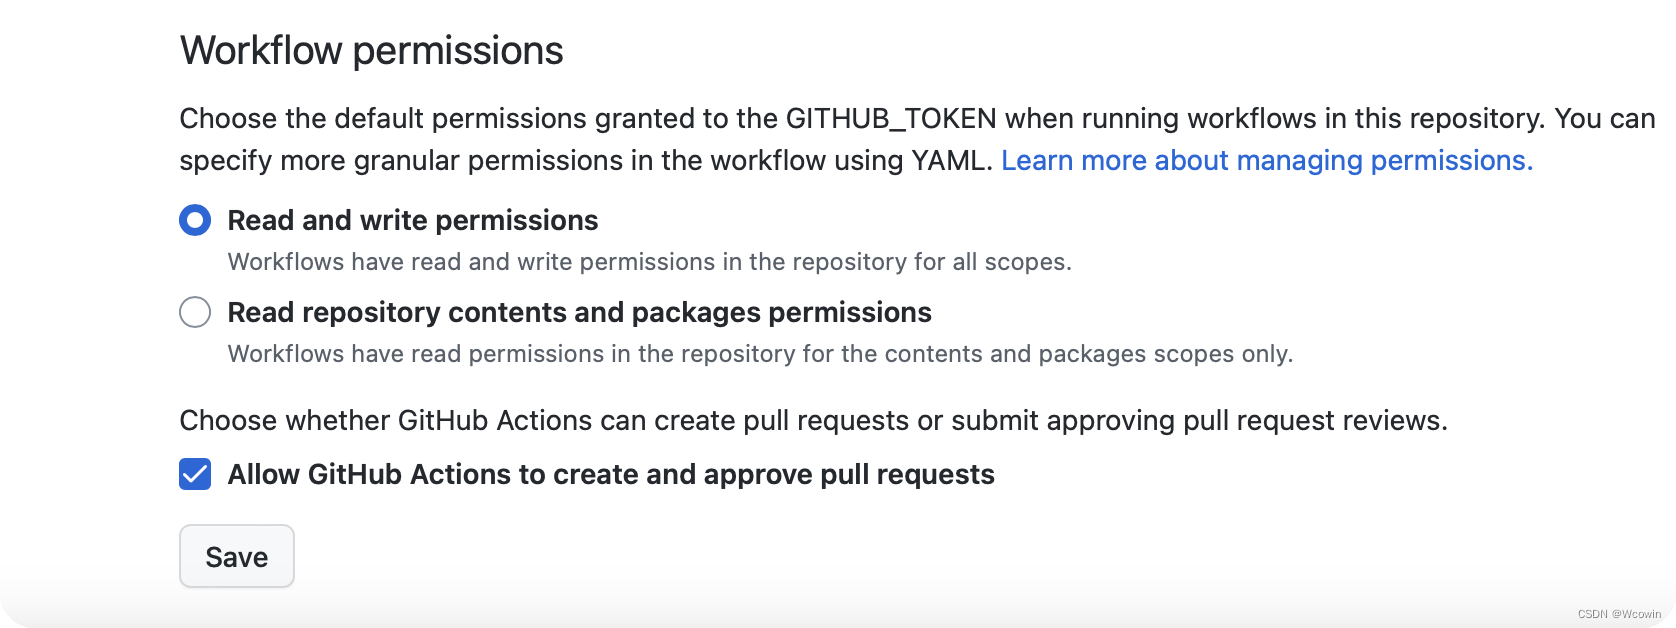
!!!重点来了
|
||
Github仓库setings/Actions/General 勾选这两项
|
||
|
||
|
||
## 三、配置完善
|
||
|
||
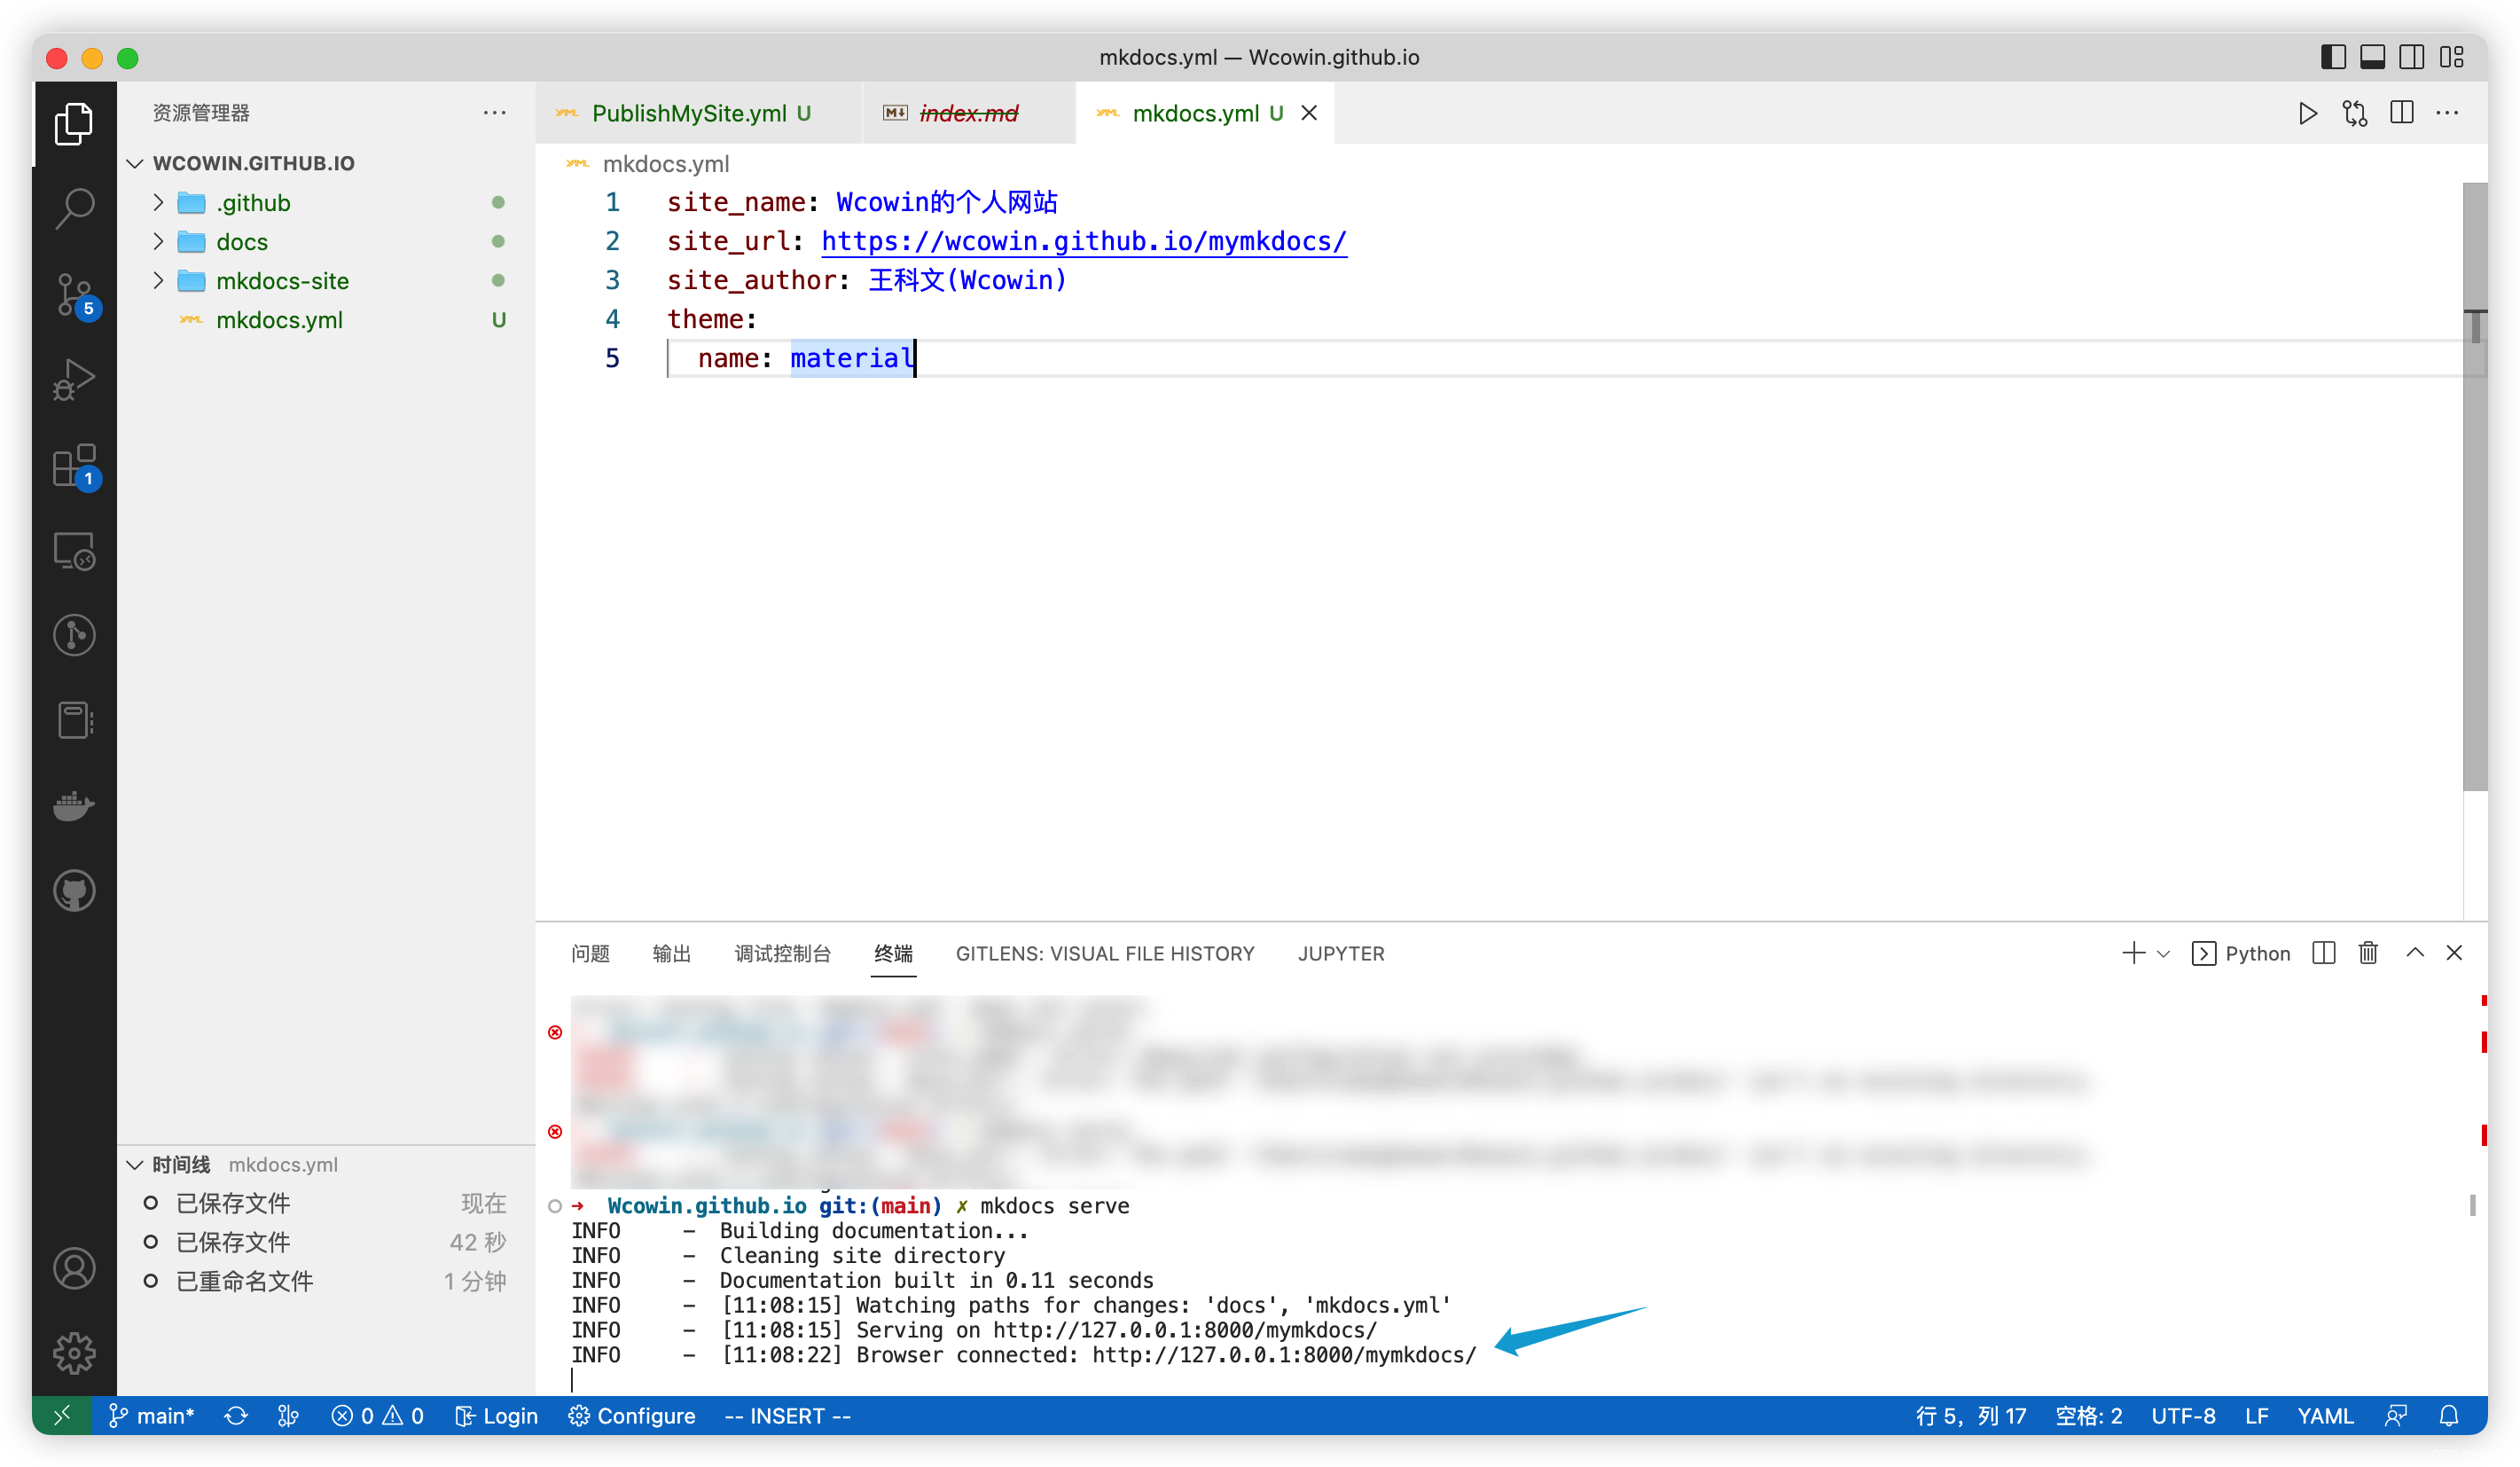
打开**mkdocs.yml**
|
||
|
||
把以下的内容输入进去(最简单最基础的配置)
|
||
|
||
```yaml
|
||
site_name: 网站名字
|
||
site_url: 网站链接
|
||
site_author: 你的名字
|
||
theme:
|
||
name: material #主题
|
||
```
|
||
|
||
|
||
详细mkdocs.yml配置见[Changing the colors - Material for MkDocs](https://squidfunk.github.io/mkdocs-material/setup/changing-the-colors/)
|
||
|
||
[下次](https://blog.csdn.net/m0_63203517/article/details/127444446?spm=1001.2014.3001.5502)我会具体谈谈这个问题
|
||
***
|
||
在下方终端运行可以在浏览器看到实时网站
|
||
```
|
||
mkdocs serve
|
||
```
|
||

|
||
|
||
|
||
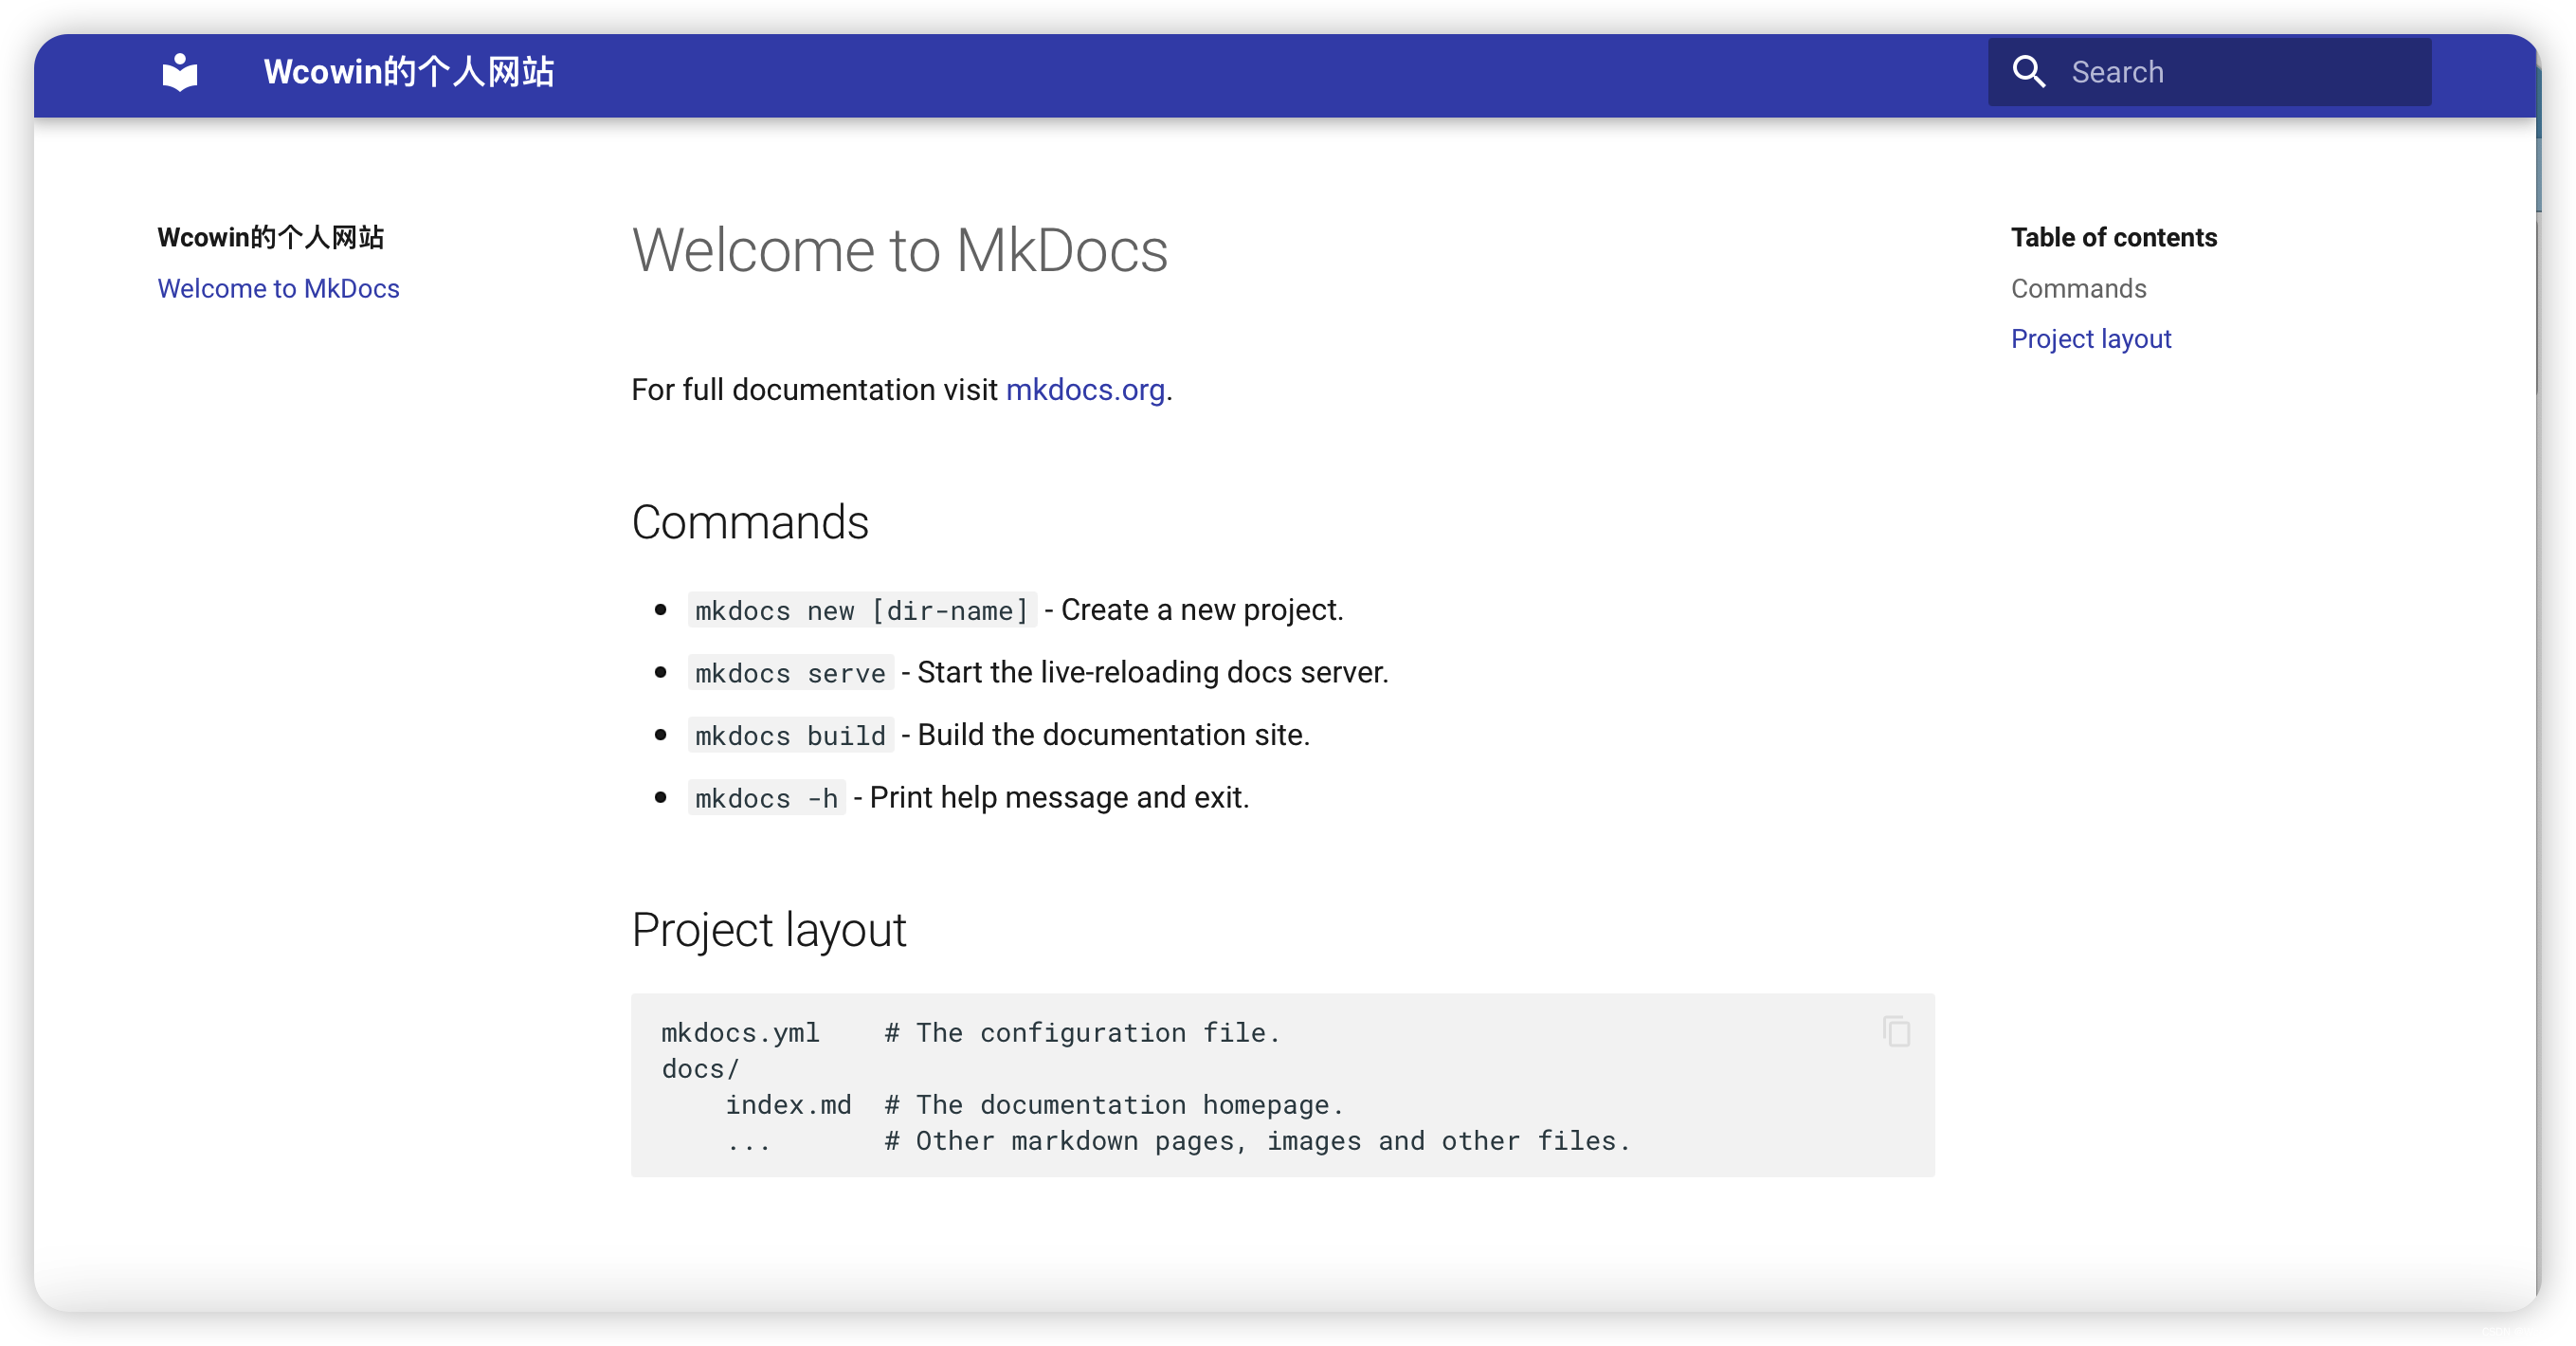
这个网站就算是初步建好了
|
||
|
||
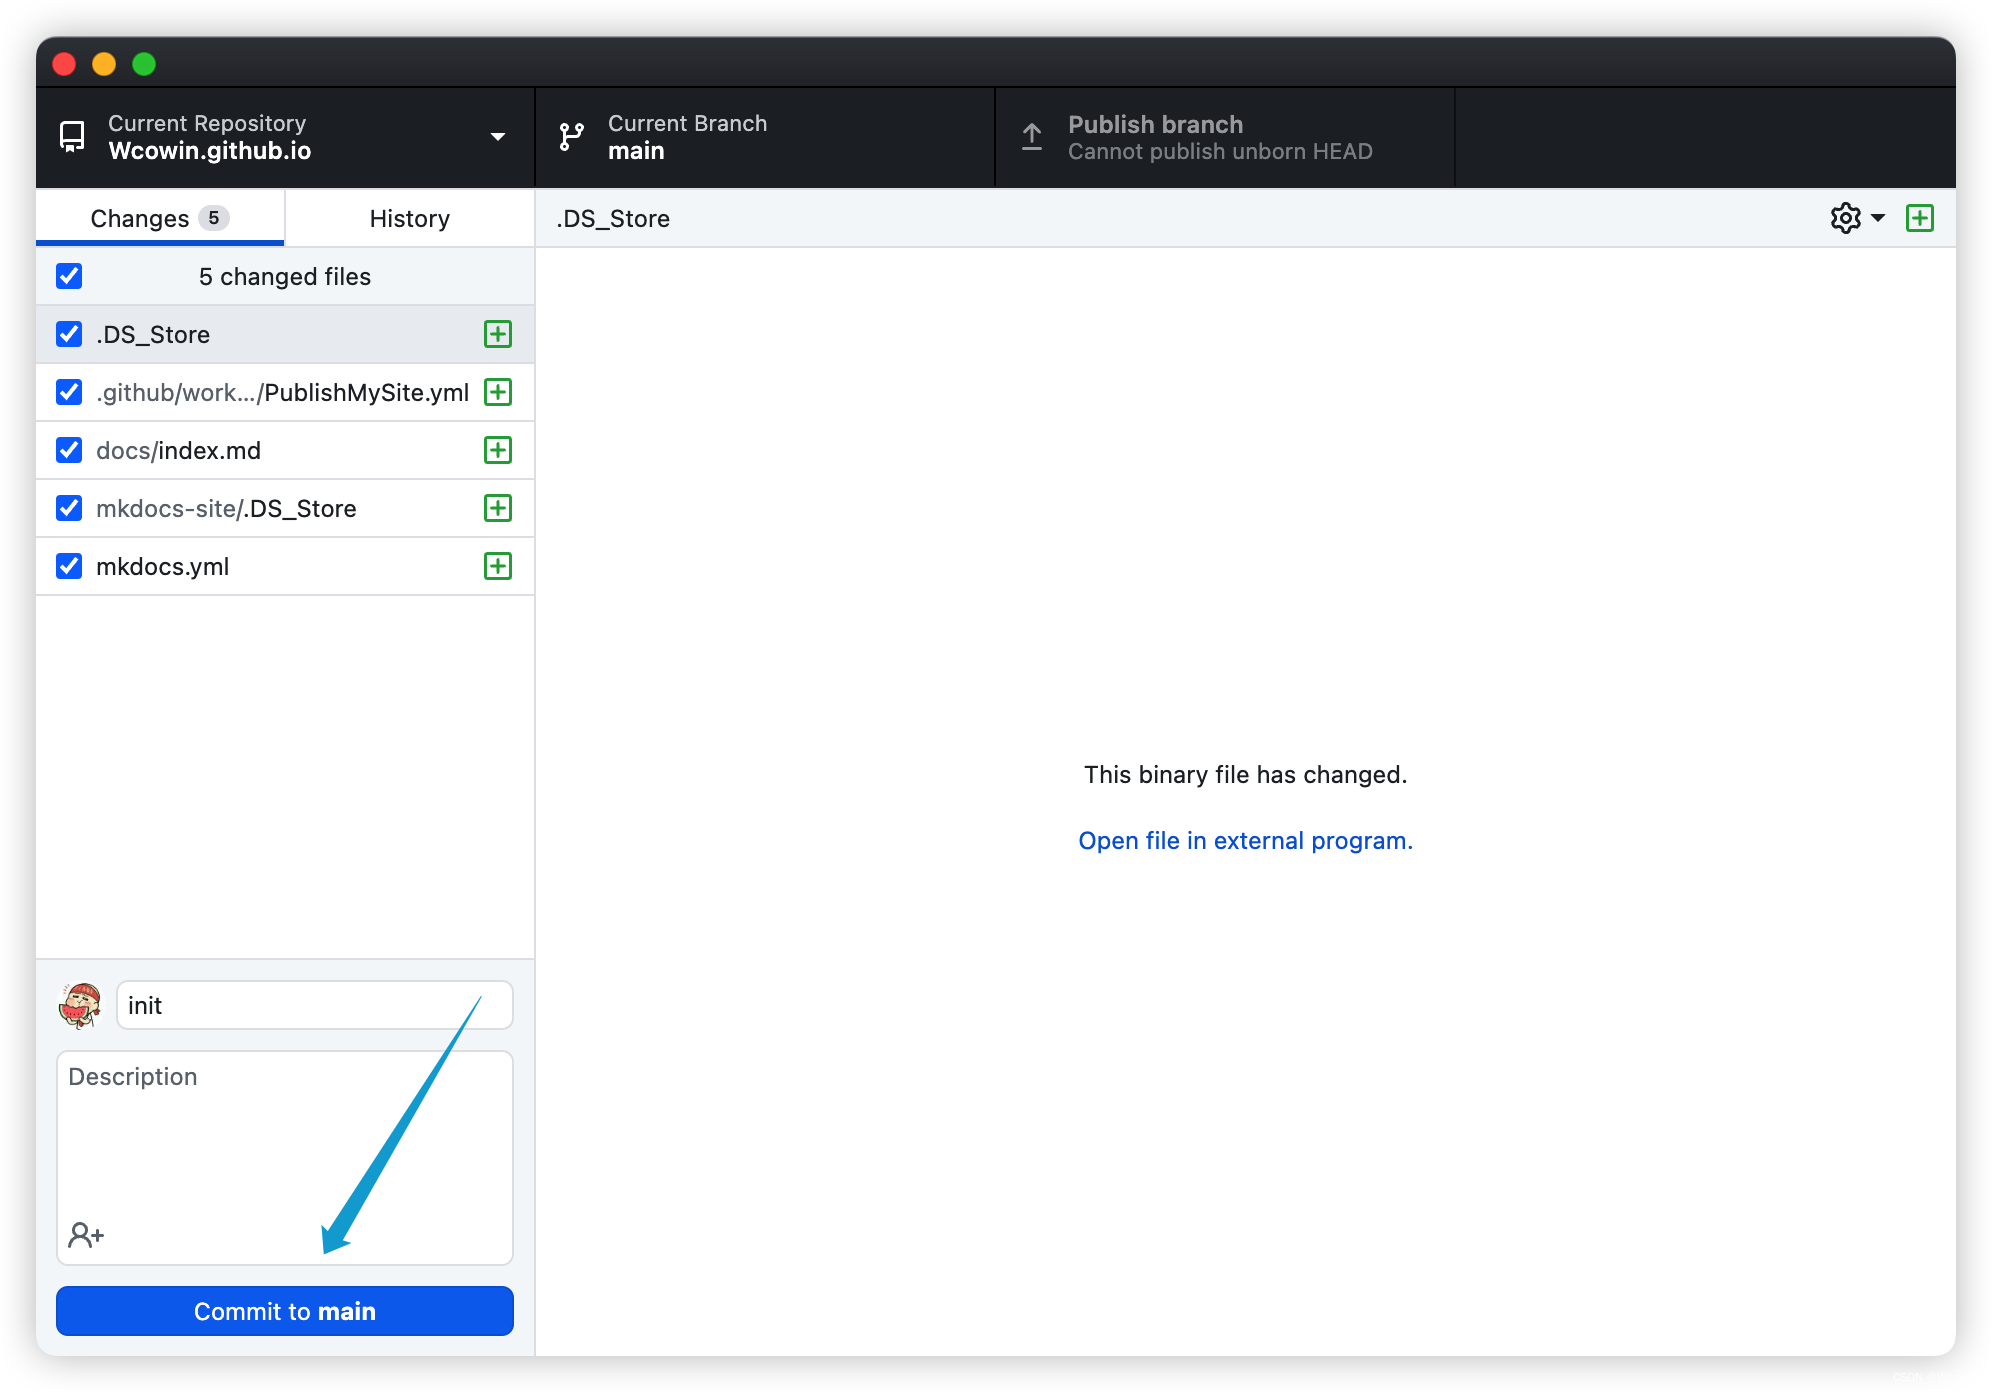
最后去github Desktop上传到github
|
||
|
||
上图可以看到,我上传了Wcowin.github.io文件夹,这个文件夹里面包含了mkdocs.yml和docs文件夹(mkdocs-site文件夹现在没有东西,可以删除)
|
||
|
||
|
||
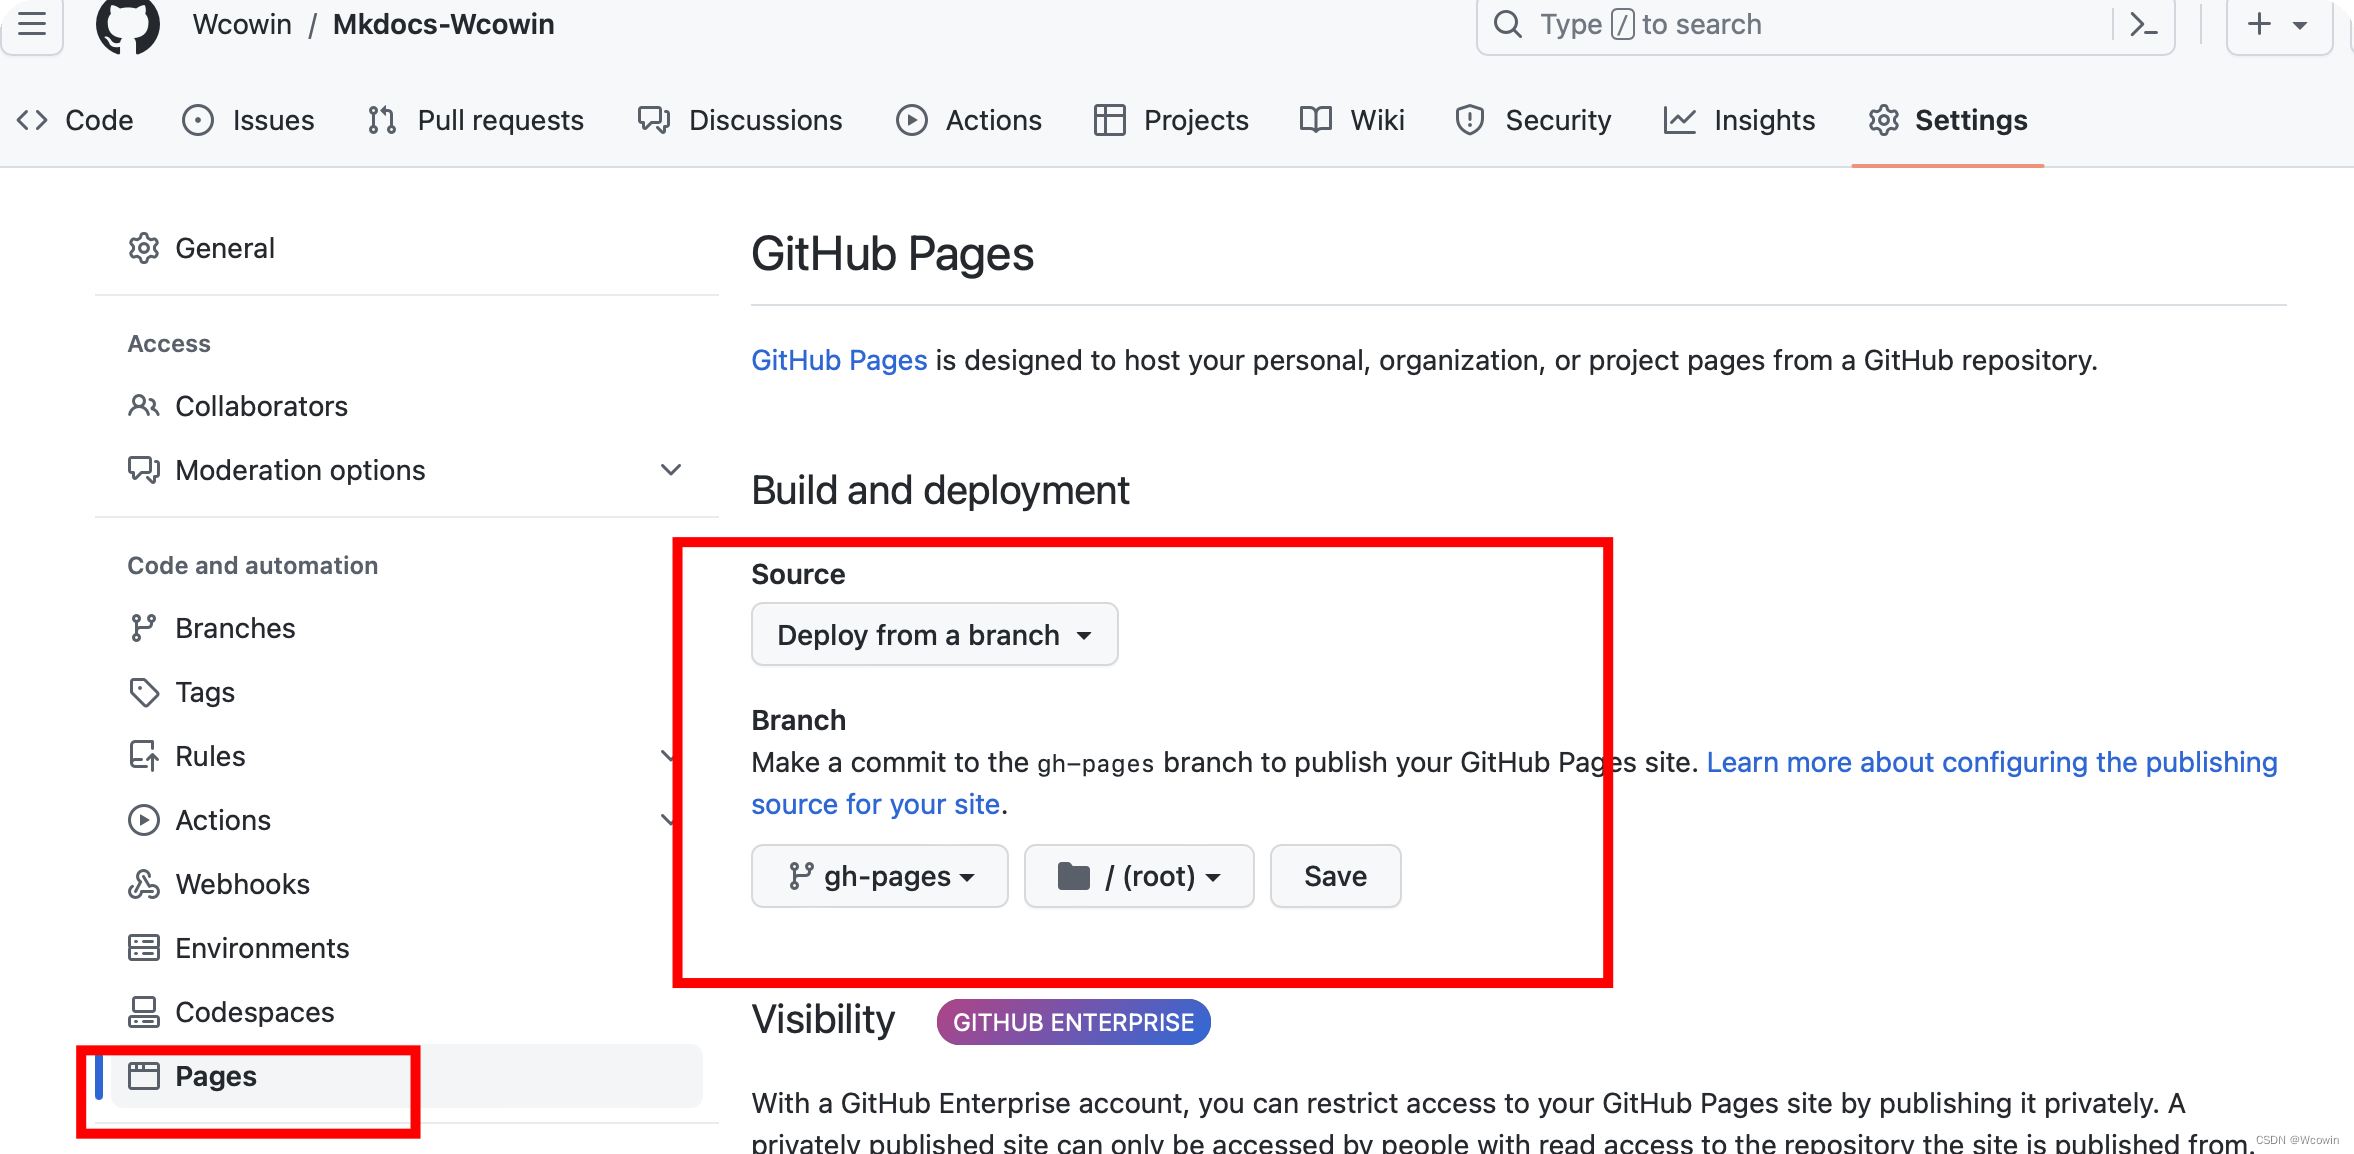
**!!!重点**
|
||
**去仓库的setings/pages选择下图示意的路径**
|
||
|
||
|
||
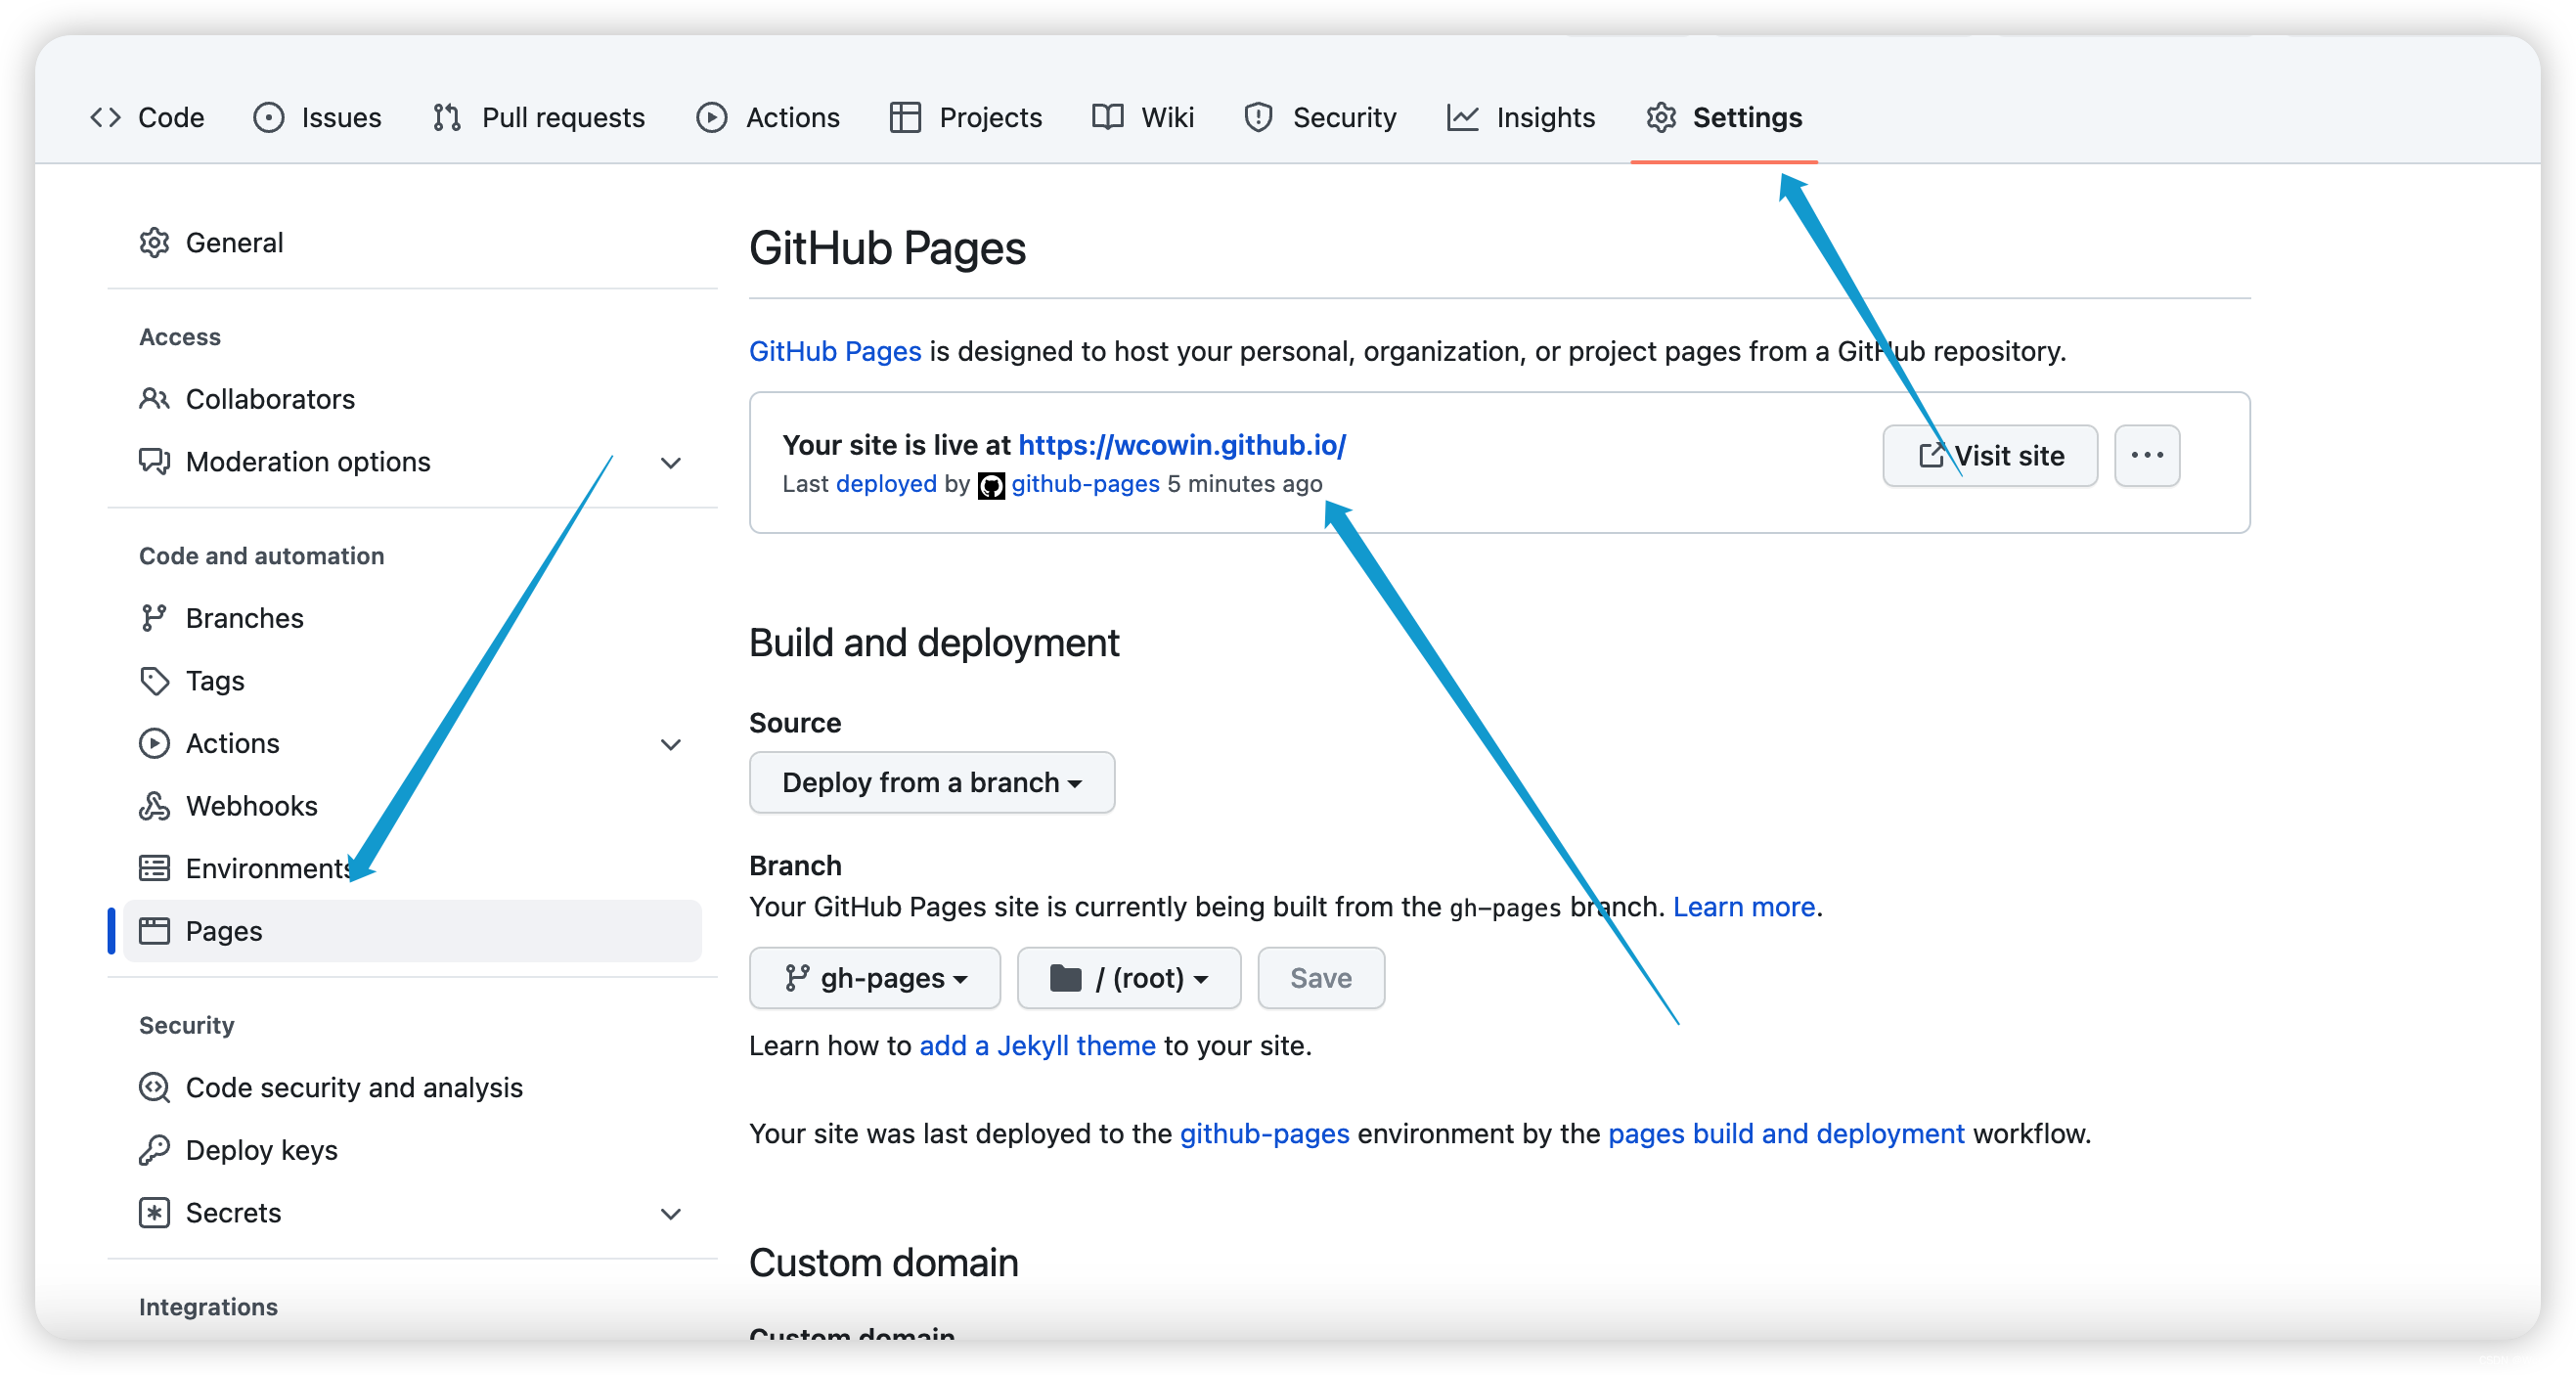
等待一会网址就出来了[^注]
|
||
|
||
你的网站网址就是:
|
||
|
||
```
|
||
https://你github的名字.github.io/
|
||
因为我绑定了域名所以网址是:https://wcowin.work/
|
||
```
|
||
|
||
|
||
下次谈谈网站的[mkdocs.yml具体配置](mkdocs2.md)
|
||
|
||
## 四、参考资料
|
||
|
||
1. [MkDocs官网](https://www.mkdocs.org/)
|
||
2. [MkDocs中文文档](https://hellowac.github.io/mkdocs-docs-zh/)
|
||
3. [Material for MkDocs](https://squidfunk.github.io/mkdocs-material/)
|
||
4. [Mkdocs 配置和使用](https://zhuanlan.zhihu.com/p/383582472)
|
||
5. [Deploy MkDocs](https://github.com/marketplace/actions/deploy-mkdocs)
|
||
|
||
|
||
[^注]:于2025.2.19重写此文 |